“Beef” and mushroom stroganoff with rice

Hey there, im so sorry its been soooo long since my last post iv had so much goin on recently an im just exhausted but now im back (inbetween redecorating my house and helping my best friend decorate her new home lol) ill keep you all updated 🙂 
Anyway I called a restaurant where im goin for a family meal on Saturday an they said they didnt have vegan options but they would be “willing to make a mushroom stroganoff but without ghe cream…..”  an I said to my friend that a stroganoff without the cream is a “notanoff” lol but then they said they would make veg fajitas so that will do.
So I have had a hankering for stroganoff since I spoke to them, then realised I have faux beef chunks in the fridge so I made my own stroganoff 🙂 

So here is my recipe for stroganoff so you never have to have a notanoff lol

Ingredients:
Faux “beef” chunks, sliced into strips (I use vbites)
3 portabello mushrooms, sliced into strips (any large mushroom)
1 onion, sliced thinly
1cup vegetable stock
1/2 cup soy cream (I use alpro)
2tsp dijon mustard
1/2 tbsp paprika (add more or less to taste)
1/2 tbsp parsley
Salt and pepper (to taste)
Optional: cayenne pepper dusted ontop to serve if you like a kick

Method:
1.  Fry onion in a little oil till translucent, add mushrooms and “beef chunks” an fry for 4-5mins, add mustard and paprika and stir thoroughly.

2.   Add the stock to the mixture now an simmer, add your dry parsley and salt an pepper to taste.

3.   Allow to simmer for about 5mins then add soy cream and mix, simmer for another few mins, taste as you go and adjust what you think it needs more of, make it according to YOUR tastes 🙂

4.   Serve on a bed of rice with a sprinkle of paprika or cayenne ontop (or really go nuts an put both ontop haha)

Hope you enjoy and again i apologise for bein MIA lol xxx

image

Categories: Uncategorized | Tags: , , , , | 2 Comments

Tooona mayo sandwich

Hey there,  soooo just cos were vegan or vegetarian doesnt mean we cant still have a yummy “tuna mayo” sandwich, but wait, tuna is a fish and the process of stealing them from the sea where they belong means that dolphins are killed and theres just no need for that an I dont particularly want to have a dead body in my sandwich……if we can survive and have a super healthy life without having to eat dead bodys then why wouldnt you?! Im living proof that anyone can be healthy and be vegan as I have a long history of illness in my life and iv not been in hospital since being vegan 2yrs ago, bearing in mind I used to be in hospital monthly!!!….being vegan doesnt mean you “miss out” on anything because absolutely anything can be veganized 🙂  when I went vegan about 2years ago I didnt think id be able to have a tuna mayo sandwich again but that didnt stop me I just put it out of my mind but I had been trying to recreate a tuna mayo style vagan sandwich filling to no avail none tasted like the sea, which is what I fancied tasting….then one day on a vegan page on facebook called “what fat vegans eat” a lovely woman shared her version of toona mayo and a light bulb went on above my head and I thought “omg why didnt I think of that it makes soooo much sense…” I cant find the post so I cant thank her by name but if your reading this then please comment so I can thank you in “person” you have rocked my world 🙂   so that secret ingredient I was missing was nori, toasted nori sheets are the seaweed that sushi is wrapped in, it tastes like the sea and is soooo good in this…..I can say with confidence that its very very very yummy cos my husband (who hates hummus and anything with chickpeas) loves this!  Pretty cool huh?!

Ingredients:

1can chickpeas drained
2 sheets of nori
1 large dill pickle (gherkin) or 4 small ones
Salt and pepper
1tbsp Apple cider vinegar
2tsp toasted sesame oil
Red onion sliced thinly
Wholewheat seeded bread
Spoonfull of egg free mayo
Cup of sweetcorn (cooked and cooled or drained straight out the can)

Method:

1-  place the chickpeas, torn up nori, vinegar,  salt and pepper, sesame oil and pickle into a food processor and pulse a few times till all combined then empty into a large mixing bowl (remember not to pulse too much u want a bit of texture)

2- add the sweetcorn into the bowl along with the mayo and stir to combine, you can add as much or as little mayo as you like.

3- now get your bread, thinly spread some vegan margarine one side of each slice (2 slice per person) then add the tooona mayo to one half of the bread then sprinkle with thin slices of red onion (you can use thin slices of pickled onion instead which is very yummy) then pop the other piece of bread ontop, cut into trianges or rectangles, whatever your heard desires hehe

The forth step is to eat it hahaha

image

Categories: Uncategorized | Tags: , , , , , | Leave a comment

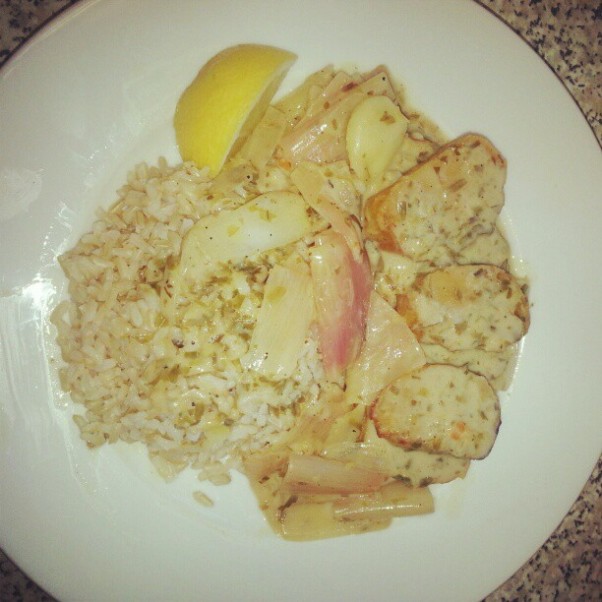
Andalusian Seitan and Rice

hey there world 🙂   here i give you such a very special recipe,  in my opinion this recipe is very special, its a taste explosion and if you close your eyes you will just think your in spain 🙂    you cant really go wrong with sherry and lemons 😛    you may be thinking “what on earth is seitan and how do i say it?”  well seitan is pronounced say-tan, sometimes called wheat-meat, you prepare it the same kind of idea as bread but its nothing like bread (if you know what i mean lol) its got a texture like meat that chewy mouth feel without the death or trauma, its a win win kinda food 🙂   seitan is so versatile you can use it in pretty much anything, i make bbq “wibs” which is my take on bbq ribs, or gyros, cold cut sandwich meat substitute, stir fry, stews …….the list is endless 🙂  it can be quite daunting at first looking at a bag of vital wheat gluten thinking, “how am i goin to pull this off” well i was in that exact same position a year and a half ago and now i honestly dont know how i got by without knowing about this 🙂

Image

   i mean…..yuuuummmm *drool* right?! lol 


Ingredients:

      1 lemon (unwaxed)

      6 tarragon sprigs

      2tbsp olive oil

      8 shallots, peeled and left whole

      4 garlic cloves, peeled and left whole

      75ml dry sherry (make sure its vegan)

      150ml  vegetable stock

      2tbsp alpro soy cream (use whatever cream alternative you like)

      salt and pepper 

      steamed brown rice to serve

      ***seitan, ready made or make your own, cut into medallions about 4 or 5 medallions each person (ill give you a recipe too)


Method:

  1. grate the zest off of your lemon (using a fine grater), avoiding the white pith, and set aside, half the lemon and squeeze out the juice into a cup and set aside.
  2. heat oil in a pan and fry the medallions of seitan to brown the edges and just enough to change the colour then remove from pan and set aside.
  3. add shallots and garlic cloves along with a touch more oil into the pan the seitan was in and fry slowly for 5mins, then add the sherry, stock, tarragon and lemon zest and give a good mix to remove and caramelized bits on the bottom and bubble for another 5mins.
  4. season with salt and pepper and add in the lemon juice and seitan, now bring to a boil and then a low simmer for 5mins then remove the seitan again and keep warm (in a heatproof bowl with lid) the seitan should have soaked up some yummy flavours from the sauce…..now add the cream and stir on a low simmering bubble until sauce is reduced,  taste and add more seasoning if needs be and once its nice and creamy and coats a spoon your ready to serve….
  5. place brown rice in the middle of a plate and assemble the seitan medallions alongside then drizzle the yummy sauce all over and serve with a wedge of lemon 🙂


****thanks to barb at “that was vegan?” blog for the best seitan recipe ever…..http://www.thatwasvegan.com/2012/01/30/my-favorite-chicken-style-seitan-recipe/

***seitan recipe:

Ingredients: 

     1 1/2 cups vital wheat gluten flour

     2tbsp olive oil

     1 1/2 cups cold vegetable stock

     1/4 cup chickpea flour

     1/3 cup nutritional yeast

     1tsp garlic powder

     1 1/2 tsp chicken seasoning

     1/2 tsp paprika

     1/2 tsp ground cumin

     1/2 tsp onion powder

     good pinch sea salt

     muslin squares (or use tin foil) 


Method: 

  1. whisk stock and oil together and set aside then in a large bowl combine all the other ingredients together and make a well in the centre,  then pour in the stock mix.
  2. stir with a spatula until the mix is pulling away from the bowl, now its time to wash your hands and roll up your sleeves and kneed the dough for 2-3mins, in a bowl for half then onto a clean worktop, then work it into the best rectangle you can muster, now let the dough rest for 10mins.
  3. slice the dough into 4 equal shapes (kind of rectangle sausage shapes) place on your damp muslin squares (or tin foil) and wrap, leaving room to expand, and steam for 30mins.
  4. remove and leave to cool for 30mins 
    969231_317827445014484_718044013_n

hope you enjoy 🙂  


Categories: Uncategorized | 2 Comments

happy birthday to me :)

hello……im soooooo super duper sorry for not posting in ages but iv been recovering from surgery on both my feet i had bones broken and pinned all over the place its been a pretty traumatic past couple of months 😦  honestly iv been through some crazy accidents and illnesses in my life but nothing compares to the pain i had post surgery 😦  buutttt im on the mend now (hopefully lol)  still very sore and still cant bend my toes but the worst is over and im back on the blogosphere (so long as my laptop holds up cos that died a few months ago and my husband managed to fix it) so this leads us up to today and why im posting now …….well, inbetween all the surgery and recovery was my birthday, i decided to grab my birthday with both hands and have a little shindig for myself and invite my girlfriends around for some good vegan buffet food and some drinks……but what about a cake? i hear you holler…..well instead of my usual carved fruit “cake”,  i made myself a 3 layer strawberry cake with strawberries inside and everything lol  It was a success ……duhh (kidding lol)

    iv had allot of interest for this recipe so this one is dedicated to everyone who asked me and had to wait a month (im truly sorry it took me so long) 


**note that i must give credit to a book that i adapted this recipe from “chloes kitchen” by chloe coscarelli, it was nearly right but just not quite…..it needed a little of my princess brain hahaha but i would advise everyone to get this book its such a beautiful book and everything looks so yummy 🙂


Image

         me looking pretty high on loads of pain meds and my massive feet lol   who likes my wheels 😛


Image

     THE BIRTHDAY CAKE FIT FOR A PRINCESS 

makes 3x  8inch cake tins

Ingredients:  

        3 cups plain flour

        2 cups caster sugar

        2tsp bicarbonate of soda (baking soda)

        1 3/4 cups rice milk (or whatever plant milk you prefer)

        1cup vegetable oil

        1/4 cup apple cider vinegar

        pinch salt

        1tbsp strawberry essence (i did try and add pink food colouring to the sponge also but it didnt work, boohoo)


Method:       

  1. preheat oven to gas 4 / 350 degrees…..grease the cake tins with some butter (i use a crumpled up bit of left over grease proof paper to smoosh the butter around)  and cut out greaseproof paper to fit the bottom of each tin.
  2. in a very large bowl (i say very cos i wasn’t prepared and had to use my big casserole pot lol)  add all the dry ingredients and mix to combine, then in a jug mix all the wet ingredients together, then pour the wet into the dry mix and either using big strong muscles and a whisk or do it like i do with an electric mixer (not very eco but im not the strongest of women lol)  until just combined (dont over mix) then pour into the cake tins
  3. bake in the preheated oven for around 30mins, turning a couple times to insure even cooking until they are golden brown and pass the toothpick test (insert a skewer into the middle of the cake, if it comes out sticky then continue to cook, your looking for the skewer to come out almost clean with a couple crumbs)  
  4. once cooked leave to cool completely on a wire rack.


pink strawberry buttercream icing:

 Ingredients:

          1 block foil wrapped stork butter (250g) (vegetable shortening) room temperature

          250g icing sugar

           1tbsp strawberry essence

           few drops of pink food colouring until it reaches the colour you desire

           couple tablespoons rice milk (just until the mixture is at a good consistency)

Method:

  1. beat the butter to a creamy consistency using your hand mixer, turn the mixer to low and add in the icing sugar slowly then the strawberry essence and a tbsp of rice milk at a time until the icing comes together to a nice spreading consistency (how many times can i say that word haha) now turn the mixer up a little and whisk until nice and fluffy……..now it should be time to build the cake 🙂


to assemble and finish the cake:  best to do this on the day of the event to keep the strawberries fresh

**you will need a punnet or two of strawberries depending on how many you want to stuff in and how thick you slice them**


  1. remove the greaseproof paper from the sponge and have your cake plate ready,  now place one layer onto the plate and spread over some icing, add sliced strawberries then another layer of sponge and continue to the top layer where you want to get your spatula and smoosh the icing all the way around in a very messy fashion if your me (lol) and make sure the whole cake is covered (if theres any icing left you can either lick the bowl or pipe a design on top then decorate the top with strawberries and your done……….see, it wasn’t that hard was it lol


Image


this is a picture of me on my birthday, i thought i had to add it so you don’t think i look like a sick person all the time lol 


                                                                love and peace,  natalie ❤ xx


Categories: Uncategorized | 4 Comments

Hummus and veggie toastie

Hello world 🙂 its been a while since I posted any recipes bit iv had a million things going on at home with things breaking, one of those things that broke was my laptop where I find it easier to type on the laptop than my touchscreen phone lol but im doing it just for you beautiful people 🙂   the weather has been just glorious in scotland right now,  well it has been sunny this past couple weeks but today its clouding over…..typical but I have been doing some summer cookin so iv been busy in the kitchen so now ill get busy writing recipes for you guys now its cloudy haha

This is an awesome lunch for anyone who likes a toastie….and even if you dont like toasties, youll like this since its just totally amazing and yummy in hits the spot….its also healthy too as I dont use oil so much anymore in my hummus and its still great…..I also dont usually put garlic in it now either as it can be too strong and my mum hates garlic…..I must admit that iv never had shop bought hummus in my life it just looks so depressing like if it had a face it would be a sad one hahaha anyway haha…..so this toastie satisfies your hunger its healthy and if you think back to what used to be “the norm” on toasties it was all things like cheese an ham on white bread an all your getting out of that is a big fat belly and thats it, theres no nutritional goodness in a cheese an ham toastie its all fat, processed meat an empty calories…..now if your not vegan your probably thinkin well theres calcium in cheese and you would be right but the poor innocent calcium in cheese is covered in saturated fats which cause heart problems….switch to a hummus toastie on wholewheat seeded bread with fresh hummus and grilled peppers an spring onions you have lots of vitamins and minerals just in chickpeas alone never mind the extra veg and the seeds in the bread….its protein packed awesomeness….but if your thinkin about the calcium side of things think about this…..

100g of whole milk = 118mg  calcium

Compared to:

100g chickpeas = 150mg calcium

Really gets you thinkin about the healthier ways to eat and still enjoy food 🙂 

image

Ingredients:
1 can organic chickpeas in water, drained and rinsed reserving a little of the water from the can.

A few jalapeños to taste, (jarred sliced kind in vinegar or water) I like it spicy so I put like 5 to 7 in lol

3 or 4 sun dried tomatoes (kind in oil but drain them so there not dripping but its ok to have a little oil)

Salt and black pepper

Red or yellow pepper deseeded and sliced (grilled either on griddle pan or health grill for the charred marks)

Courgette sliced in thin ribbons and grilled with the peppers

Spring onion (scallions) thin sliced

2 wholewheat seeded bread per person

Method:

1.  First heat your grill and prepare the raw veg put a tiny bit of extra virgin olive oil into your palm (a drop of oil) and rub hands together then massage the veg, this coats the veg without adding loads of oil…then place on grill for 5 mins or until the veg is marked with those lovely stripes of char 🙂 

2.   While veg is grilling, throw your chickpeas, sun dried tomatos and jalapeños into a food processor, add a pinch of salt and pepper, a drizzle of chickpea water an whizz, stopping and making sure everything is bein mixed, you dont want it smooth you want it a little chunky an good texture……taste an if u want it more spicy add more jalapeños or if it needs another tomato then go for it….its as simple as that!

3.  Now to assemble the toastie,  take a slice of your bread and spread a good coating of hummus ontop, then sprinkle the spring onions ontop then the grilled veg, add a little salt and pepper and stick the lid on, in other words put the other bit of bread ontop…put it in your health grill and close….in a few mins once its all nice n toasted with the nice stripy design on the bread its ready to be cut into triangles and served with a salad 🙂   simple, healthy and all made in under 10mins!! 🙂 

Note:  you can spread some margerine thinly on the outside of the bread so it toastes more golden but you dont need to….

Categories: Uncategorized | Tags: , , , , | Leave a comment

Pastina

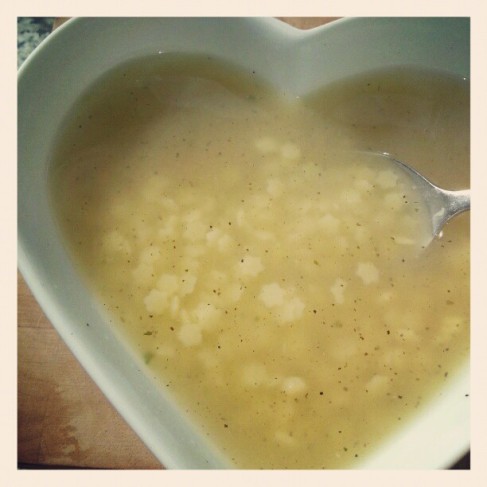
buona giornata di tutti 🙂  i bring this “recipe” today as a little window into my childhood and the childhood of any family connected to italy in any way….i put recipe in quotation marks because its not really a recipe at all just a little bit of history into a total winner of a dish,  all the kids in my family LOVE pastina and its been a massive part of our diet growing up……i didn’t realize it was such a prevalent dish in the history of italian cuisine……..first off pastina translates as “little pasta” and they’re not kidding, its so tiny and cute, you get all different shapes for example hoops, tiny stars, alphabet, shells and bow ties the list is long lol   its great in use in soups as well as just cooking it and serving it with some butter and pepper,  Pastina is made differently by each family and everyone has there own take on it for example adding meat or eggs and cheese but the way my family serve pastina is my favourite, it conjures up memories of my granny or my auntie making a pot of it while we were all moaning about being “starving” haha they would sit us round the table with a bowl each and a little drizzle of milk to cool it down and we would all tuck in to a big plate of bread and butter cut into soldiers (fingers) to dip in the broth,  everyone loves this soup, not only is it great to start babies out on pasta but its great for adults, kids and anyone whos feeling a little under the weather…..the same way as chicken noodle soup is a staple in millions of peoples homes for sickness, its great because you are getting fluids and some calories so you magically get better haha 

   I really have faith that if your kids like pasta they will love this ……in a pinch if you really cant find any pastina then just get a few strands of spaghetti and break it up into tiny tiny bits…..problem solved lol

Image


Ingredients: 

vegetable bouillon or homemade vegetable stock

1/2 cup pastina shapes

3 cups boiling water

pinch ground black pepper and a pinch salt


Method:

  1.  pop everything in a pot and cook till pasta is cooked through about 6-8mins depending on the shape, taste stock and add more pepper or salt or even add a little more boullion if it needs it….you can add as much water or pasta as you like its up to you how brothy you like it or if you want more pasta 🙂    serve with some bread and butter soldiers and if there are kids eating it then pop a little plant milk in it to cool it 🙂  


I hope you make this a family favourite to pass down the generations like the italians do 🙂  


                                buon appetito  xoxo

Categories: Uncategorized | Leave a comment

4 bean and veg chili!

hi everyone around our lovely planet 🙂  so here i bring you my favorite chili recipe EVER…..everyone who’s tried it loves it and i’m very proud of it 🙂  its healthy and hearty too and you can put as much or as little hot sauce in as you like or even omit the hot sauce and just serve the chili in a pot in the middle of the table with a ladle in it, leave bowls, tortilla chips or pitta chips (or both), and little bowls of chopped tomatoes, chopped onions, jalapenos, guacamame (see the taco recipe for guac recipe), vegan cheese and sour cream (i’m not too keen on those options but at a diy chili station anything is possible, put a bottle of hot sauce next to it all and let everyone dig in and make there own variations 🙂  it makes it fun and nice for a change of pace 🙂


Ingredients:

2 tins mexican bean mix (or 2 cups mixed dry beans soaked overnight)

1 large spanish onion, chopped

1 green bell pepper, chopped into little cubes

3 garlic cloves, chopped

1 bottle of vegan lager, Stella Artois is vegan

tinned chopped tomatoes

palmful of each… ground cumin, steak seasoning, chili powder

half palmful of ground coriander

1 cup frozen sweetcorn

cup of vegetable stock (top up with more if it drys out)

hot sauce, i use encona brand here in the uk but just use your favourite and as much or little as you want

salt and cracked black pepper to taste


Method:

  1. heat extra virgin olive oil in a big pot and sizzle some chopped onions for about 3-4 mins until translucent then add chopped peppers, garlic and fry for a few mins then add the beans and corn…..add the dry spice and quickly stir through adding the whole bottle of beer to deglaze the pan, scrape all the cooked on bits on the bottom….now add tinned tomatoes and puree and hot sauce…..
  2. bubble for 30mins and adding a touch of stock here and there to keep moist, add salt and pepper to taste and serve in whichever way you prefer 🙂


581721_285687244895171_694161956_n

Categories: Uncategorized | Leave a comment

Strawberry Nutribites

hey again…. i’m adding two recipes today because i’ve kinda neglected you due to being in mexico and having too much fun but i’m back on it and looking into making this site a “.com” to make it easier to search for recipes and showcase my food better so nothing gets lost.  

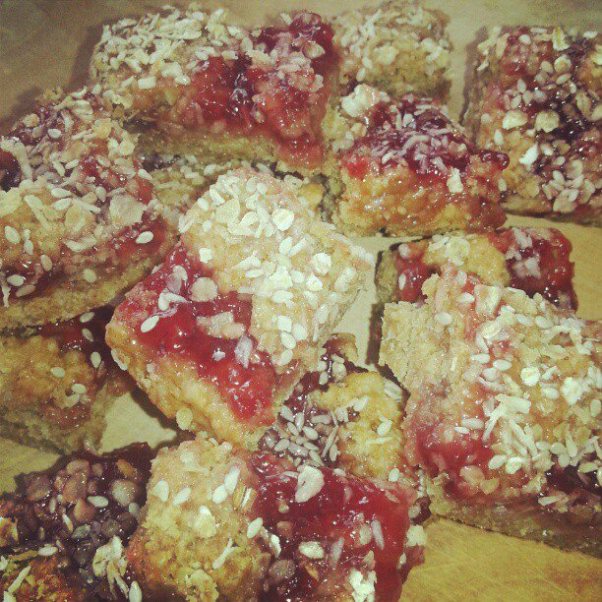
This is a really tasty recipe and great for a snack to take to work, thats why i made them tbh, my husband used to eat those breakfast bars all the time and i dont like that i dont know whats in them and they have additives and such likes in them and thats not cool!   but these are just as good as a cold snack bar as they are warmed with a dollop of ice cream on top as a dessert 🙂   

Ingredients:

1 & 1/2 cups regular oats
1 cup of a mix of white and whole wheat
1/2 tsp bicarbonate of soda
pinch sea salt
1/2 cup light brown sugar
1 chia egg (1 tbsp chia seeds+ 4 tbsp warm water, mixed and set aside)
just over 1/2 cup vegan butter, melted (i use foil packed stork)
1/4 cup brown rice syrup
2 tbsp any plant milk
1 tbsp sesame seeds (for topping only)
1 tbsp dry shaved coconut
organic strawberry conserve (jam) you can use any jam you like.
punnet of strawberries, washed hulled and chopped / sliced
small handful oats to top

1. Preheat oven to 350F/gas 4. Line a square pan with greaseproof paper.

2. In a large bowl, mix all the oaty base dry ingredients: oats, flour, sugar, bicarb and salt….. In a small pot mix the butter, syrup, milk until melted, remove from heat and allow to cool a little then add the chia egg.

3. Combine wet and dry base ingredients in the large bowl until thoroughly smooshed together (technical term lol)

4. Pour the oat mixture onto the square pan and press down with fingers…make sure your hands are wet to smoosh the mixture into the pan it stops the mixture sticking to your fingers….Pour on strawberry jam and smooth out….then lay your chopped strawberries over the top.

5. Now sprinkle on your sesame seeds and coconut and finish off with a handful of porridge oats on top too.

6. Bake for around 30-40 minutes then remove, set aside to cool before removing from the tray (about 30mins)
Slice and then store in a container in the fridge to keep them nice and firm or serve them warm with ice cream.

Image


Categories: Uncategorized | Leave a comment

Pesto pasta n peas

happy monday people….usually mondays are really depressing, normally because its the start of the new work week, back to school and you’re still wishing it was saturday haha   well this recipe is great to perk you up and if you eat this with your eyes closed you will be transported to a flower filled meadow with a picnic and a bottle of wine…..hahaha well, thats true if you have a really good imagination …..but really though this recipe is so yummy and FRESH, makes you feel all sping/summery…..its great for eating warm but also really good for packed lunches and for picnics or ever for a potluck or BBQ ….its an all round winner to be honest, great for any occasion and my husband requests it for his lunch all the time !!

   I’ve found allot of people are worried to try pesto because its green and they’re worried they won’t like it, i was one of those people too so theres no need to hang your head in shame lol  but when you try it you’ll be surprised at how yummy it is…the only word i can think of to describe it is FRESH ….. i’m starting to sound like will.i.am, but it really is the only word to describe it….if you can think of any more then comment lol


time to prepare 5mins   time to cook 10-12 mins depending on cooking time of pasta 

Ingredients:

    For the pesto:

1 1/2 cups fresh basil leaves
1/3 cup extra virgin olive oil
1 cup pine nuts
5 cloves garlic, grated
1/3 cup nutritional yeast
pinch sea salt
pinch of ground black pepper

      For the pasta:

400g short dry pasta, twists or bowties whatever you prefer, you could even do a mixture of a few this works with any short pasta

couple spoonfulls vegan mayonaise
good handfull pea shoots chopped very roughly
cup of frozen sweetcorn
cup frozen garden peas
cup frozen shelled edamame beans


Method:

  1.  First off gather all your ingredients up so your organized, it will cut your cooking time down…get a big pot of salted water to a rolling boil and add pasta.
  2.  As soon as the pasta is in the water get your pesto ingredients and pop them all into a food processor and blitz until it forms a lovely green pasta adding a little extra virgin at a time so you don’t use too much, once its all combined thats your pesto ready (you can store leftover pesto in a jar in the fridge and use it in sauces and in toasties)
  3.  when your pasta is nearly ready throw in your frozen veg and boil for a few mins more until there cooked through and drain the whole pot into a colander   place your pasta and veg into a large mixing bowl and add your mayo, a couple spoons of pesto, chopped pea shoots and give it all a big stir to combine all the ingredients and form a sauce……there you have it….the quickest pasta ever …..    great for if you were suppose to bring food to a potluck and you forgot to make something haha

Image

Categories: Uncategorized | Leave a comment

Jar Noodles

Hello world, hope your all well and enjoying springtime wherever you are,  here in bonny Scotland its freezing cold, infact its looking like its going to be the coldest March/April on record…..Brrrr !!  Its so cold right now were wondering why we ever came back from our holiday to mexico last month lol (more on our holiday soon)  

   This recipe is, as usual, one i love and depend on for a quick snack but for ages iv been making these jar noodles in a pot and called them pot noodles but they were more hassle and more washing up than you want to have after a quick lunch…..for years previous to me eating healthy and vegan i would get pot noodles an ramen noodle pots for quickness and sometimes to heat my cold hands up lol  A hot bowl of noodles in broth is allot better at heating you up than a sandwich so it wins on that level every time haha   A great snack for taking to work, school or even camping (so-long as you have access to hot water.)

   Also i collect jars as you know from anywhere, i have family donate them to me and i even buy pickles and things just for the jars….ok, i say “just” for the jars but i have to admit i do love pickles lol  I use these jars for storing leftover soups, sauces, storing dry ingredients and of course for jar noodles!    Why don’t you start collecting all different jars and using them to store leftovers in…its allot safer than using plastic containers and allot cleaner too…..with no possibility of putting any harmful toxins into your food, your body or your children’s and pets bodies!  You can use glass in the microwave or the oven without any dangers or toxins but if you use a plastic container to heat food in the microwave you are putting hundreds of harmful toxins into the food without even realizing it, two examples BPA and DEHP….if you don’t know what it is then it shouldn’t be going in your body….that’s how i roll.  not to mention the other great benefits, its cheaper, safer, food tastes better, helps the planet and easier to clean.  if your thinking “you had me at hello” then ditch the plastic and tupperwear and splash out on some glass storage containers and reuse jars 🙂  they will last forever 🙂

Image

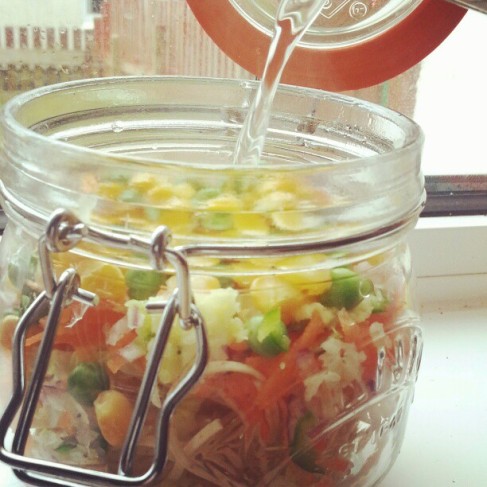
   This is such a clever idea you’ll wonder why you didn’t think of it before 🙂

Ingredients:


1 small nest of thin, quick-cook noodles (wholewheat if you can find it)
1tsp vegetable bouillon powder (i use marigold but you can use whatever is at hand like a stock cube crumbled up)
a small squeeze of brown rice syrup (1/2tbsp)
1/2 small carrot, peeled and grated
2 button mushrooms chopped
1 spring onion, finely sliced
just under a cup of frozen peas and sweetcorn (defrosted)
1 leaf of spring greens/green cabbage/leaves pak choi, shredded (i used savoy cabbage in the pic)
1/2tsp freshly grated ginger
1/2 garlic clove, grated
1/4 red or green chilli, finely chopped (remove seeds)
2 tsp shoyu or soy sauce
juice of 1/2 a lime

Method:
Note; if preparing to eat immediately then skip the part in step 2 where it says put the wet ingredients into a jar and just add them as normal at the end.

1. Pop all the dry and vegetable ingredients, in a recycled jar with lid or kilner jar.
2. Put the wet ingredients into a tiny jar, iv used a tiny jam jar iv washed and kept for an occasion like this 🙂
3. Pour over boiling water to cover, and leave for 8-10 minutes covered.
4. Stir, add the soy sauce and lime juice to taste and eat.


Image

Categories: Uncategorized | Leave a comment

Create a free website or blog at WordPress.com.